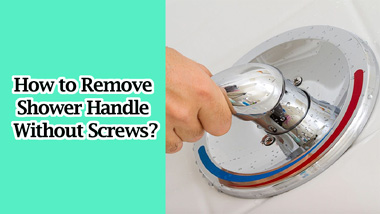
Removing your shower handles is typically not a frequent task, but situations like leaks or clogged filters may necessitate their removal. You might be wondering how to go about this without screws, and surprisingly, it’s not a complex process. All you need is a flat screwdriver to pop out the cap or button and make sure to turn off the water supply before proceeding. Then, simply remove the screws located inside, and the shower handle should come off easily.
It’s worth noting that this method isn’t universal, as different shower handles may have varying designs. In today’s discussion, we will cover how to remove various types of shower handles without screws. So, without further delay, let’s get started.
Why Should You Remove The Shower Handle?
There are 5 main reasons why you might need to remove a shower handle:
1. Maintenance and Repairs
If your shower handle is malfunctioning or leaking, you may need to remove it to access the inner components, such as the cartridge or valve. This allows you to perform repairs or replace faulty parts to ensure your shower functions properly.
2. Cleaning
Over time, mineral deposits, soap scum, and grime can accumulate around and under the shower handle. Removing the handle makes it easier to clean these areas thoroughly, improving the overall appearance of your shower.
3. Upgrading or Replacing
If you want to upgrade your shower fixtures or change the design of your bathroom, you’ll need to remove the existing shower handle to install a new one that suits your preferences and style.
4. Painting or Tiling
When you’re painting the bathroom walls or tiling the shower area, removing the handle ensures that you can work on the surface without obstruction. It also allows for a cleaner and more professional finish.
5. Accessing Plumbing
In some cases, you may need to access the plumbing behind the shower wall. Removing the handle can provide access to the pipes and connections for maintenance or renovations.
What Are The Different Types Of Shower Handles?
Shower handles come in various types, but they can often be categorized into three main categories:
1. Knob Handles
Knob handles are the most prevalent type of shower handles. They typically feature a circular design, similar to a doorknob. To control the water flow, you need to rotate them in different directions, which allows you to turn the shower on and off. While the shape may vary slightly, the fundamental operation involves rotation.
2. Lever Handles
Lever handles are the second most common type of shower handles. These handles require you to move a lever either up and down or sometimes sideways to control the water flow. Some lever handles offer the added functionality of adjusting water temperature by moving the lever in a horizontal direction.
3. Cross Handles
Cross handles, as the name suggests, typically have an X-shaped design. They operate by rotating the cross-shaped handle to turn the water on and off, similar to knob handles. While less common in contemporary designs, cross handles can be an excellent choice for those with arthritis or for individuals seeking a vintage or retro aesthetic in their bathroom decor.
These three types encompass the majority of shower handles available, with their designs and functionalities catering to various preferences and practical needs.
Tools and Materials Required to Remove Shower Faucet Handle Without Screw
Sometimes, you won’t even need any tools to remove a shower faucet handle without screws, but here are 5 tools you should keep beforehand just in case.
- A Flat Screwdriver
- An Allen Wrench
- Old Cloth
- Rust & Corrosion Cleaner
- Pliers
The Allen wrench is optional and is only required for lever handles, but it’s always good to keep it just in case. Other than that, you’ll only need a flathead screwdriver, and you’re good to go. Hex screws are easier to remove with Allen wrenches too.
Most of the time, you won’t need a rust or corrosion cleaner, but it’s good to have it near. You should clean the shower handle every time you take it out, too, since you usually won’t be taking it out too often.
How to Remove Shower Handle Without Screws? Easy Steps
Now that you know all about the necessary tools required for removing shower handles without screws, here’s a step-by-step guide.
For Single Unit Shower Handles
When it comes to removing single-unit shower handles, here’s a step-by-step guide to help you through the process:
1. Turn off the Water Supply
First and foremost, ensure you turn off the water supply to your shower. Neglecting this step may lead to unwanted water leakage or spraying during the removal process.
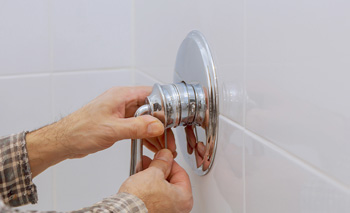
2. Pop the Cap Off to Reveal the Screw
Often, it may seem like your shower handle has no visible screws, but they are usually concealed beneath a cap or button on the handle. Using a flat screwdriver, gently pop off this cap, and it should reveal the screw hidden underneath.
3. Twist the Handle (If No Visible Screws)
In some cases, even after removing the cap, you might not immediately spot a screw. This likely means your shower handle utilizes a twisting mechanism. Simply twist the handle gently, and this action should either reveal the screws or allow the handle to pop off.
4. Remove the Screws
Once you’ve turned off the water supply and uncovered the screws, proceed to unscrew them. While a regular screwdriver can do the job, it’s recommended to use an Allen wrench or key, as it can make the unscrewing process more manageable. The screws can be small, so be attentive and keep track of them, as losing even one can lead to potential issues like leaks.
5. Take the Shower Handle Out
After successfully unscrewing, you should be able to remove the shower handle. Keep in mind that not all handles are directly affixed to the screws, so you may require pliers to help you extract the handle from its position.
For Double Shower Handle Units
Removing double unit shower handles is a relatively straightforward process. Here’s a guide on how to do it:
1. Turn Off the Water Supply and Twist the Base
To begin, ensure that you turn off the water supply. With double shower handles, hold the arm of the handle and twist the base counterclockwise. Be cautious not to turn it clockwise, as this could risk damaging the handle.
2. Unscrew and Remove the Handle
Once you’ve turned the base, you should be able to access the screws. Use either a flat head or Phillips head screwdriver to remove these screws. Following this step, you can take out the handle, allowing access to the cartridge. Remember to reassemble everything in the same way you found it during the reinstallation.
For Lever-style Handles
Removing lever-style handles can be a bit more intricate than regular single or double-unit handles. Here’s the process for removing them:
1. Turn Off the Water Supply and Remove the Button
Start by turning off the water supply, then locate the button on your lever-style shower handle. Use a flat screwdriver to carefully pop the button out. These buttons are usually delicate, so handle them with care. It’s a good idea to have replacement shower faucets on hand, just in case.
2. Remove the Allen Key and Pull Out the Handle
Lever-style handles don’t typically have visible screws; instead, they use Allen keys. To remove them, use an Allen wrench that matches the key size. Insert the wrench and, with the right-sized Allen key, you should be able to pull the handle out. These Allen keys are sometimes referred to as the shower knob’s set screw, so you can find the correct wrench size by checking the shower handle’s documentation or website.
These steps should help you successfully remove double unit shower handles and lever-style handles with precision and care. Be sure to keep all components in order for a smooth reassembly process.
Tips And Tricks To Follow When Removing Shower Handle Without Screws
Here are some helpful tips and tricks for dealing with shower handles that have no visible screws:
1. Clean Mineral Deposits
If you’ve popped the cap or button off your shower handle and still can’t locate any screws, mineral deposits may be clogging the handle’s interior. To resolve this, you can clean the handle using a rust or corrosion cleaner. Alternatively, you can create a homemade cleaning solution by using lemon and distilled white vinegar. After cleaning, wipe the handle with a cloth, and this may reveal the hidden screws.
2. Check the Brand
Many modern shower handles are associated with well-known brands. Even if your handle isn’t from a major brand, it likely has a website where you can find information about its design and removal process. Checking the brand’s website can save you time and eliminate the need for additional tools beyond a screwdriver.
3. Inspect the Base of the Handle:
Sometimes, the screws may be concealed near the base of the shower handle, typically in the form of hex screws. In this case, using an Allen wrench is the most effective method to access and remove these hidden screws.
By applying these tips and tricks, you can overcome the challenges of removing shower handles without visible screws, making the process more efficient and manageable.
Frequently Asked Questions
Here are a few common questions that we get asked a lot.
1. How much does it cost for a replacement valve for a shower?
Most of the time, a shower valve replacement can cost between 200$ and 600$. It depends a lot on the type of valve as well as the brand. Replacing the cartridges won’t be as expensive, though, usually being between 100$ and 350$.
You can get away with just replacing the cartridge most of the time anyway, so we’d recommend you change the cartridge first before replacing the valve.
2. Can some shower handles have absolutely no screws?
If your shower handle doesn’t have any screws, it’s definitely a twisting handle. A lot of the time, people don’t twist the handle hard enough and think it’s not a twist handle. So make sure to rotate the handle relatively hard.
If it still doesn’t twist and you don’t see any screws, it’s likely stuck to the wall. The best option then is to call a plumber.
3. Is there a shower handle removal tool?
Yes! Although they aren’t too common, there are some shower handle removal tools that can help you remove handles in a matter of seconds. These work not only on shower handles but also on regular faucets and taps.
Conclusion
Hopefully, now you have a good idea of how to remove the shower handle without screws. To give a quick recap, they usually aren’t too difficult to remove, and you can twist them. But if you can’t, you can simply pop off the button or cap and unscrew it.
The process may be slightly different for a lever-style handle, as it has an Allen key instead of a screw. You should make sure to clean your handle if you can’t locate the screw or Allen key.
This brings us to our final tip, which is to use CLR to clean your handles. It’s the most common cleaner for shower handles as it can quickly clean away any mineral deposits from your handle.
With that all being said, good luck and cheers!