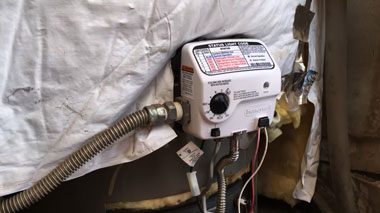
Honeywell appliances like furnaces or water heaters use gas valves to control the flow of natural gas. A faulty gas valve may cause serious hazards, so you must check the valve regularly to ensure it is safe and working properly.
But how do you do Honeywell gas valve troubleshooting? There is a LED on the gas valve, which has multiple flash sequences to identify the problem. The different sequences give different meanings.
We will elaborate on these sequences to find the causes and troubleshoot problems accordingly. Know these sequences and troubleshoot problems as soon as possible to keep the valve in good working condition.
Honeywell Gas Valve Troubleshooting & Solutions
There are 15 common problems in Honeywell gas valves. Learn how to troubleshoot each problem.
1. No Electrical Power
There will be no LED flash in this case. It is because either the power switch is turned off or the supply voltage is interrupted.
Solution-
- Try sliding the power switch to the ON position and ensure enough power is supplied to the system
2. Weak Pilot Flame Current
If the LED status code shows one flash after a pause of one second, it means the pilot flame current is weak. This can be caused by an unstable pilot or a restricted pilot tube. Oxidation on the electrode, damaged pilot wire, or low pressure in the gas supply can also cause this problem.
Solution-
- You need to check the gas pressure and supplied voltage to solve this problem. Sometimes, replacing the pilot assembly is required
3. Pressure Switch Failed Closed
The LED will flash twice after a pause of three seconds to indicate this problem. When the pressure switch tube is blocked or has gone bad, this problem occurs in gas valves.
Solution-
- You might need to clear or replace the pressure switch tube. If the switch is faulty, replace the pressure switch and check the wiring
4. Pressure Switch Failed Open
In this case, there will be a total of three LED flashes with a pause of three seconds. A blocked or improperly configured vent or a faulty blower can cause this issue. If the temperature switch on the blower is open or the pressure switch is faulty, you will encounter the same problem.
Solution-
- Check the vent system for obstruction and the temperature switch on the blower. If needed, you must replace the temperature switch, pressure switch, or blower
5. TCO Limit Lockout
The LED will flash four times with a pause of three seconds. If the thermal well or gas control fails or the tank doesn’t have water, this problem can occur.
Solution-
- Resetting the gas control will solve the issue. Otherwise, you need to replace the thermal well. Also, keep the tank full
6. Flame Out Of Sequence
Five LED flashes with a pause of three seconds indicate this problem, where the pilot or burner gas valve doesn’t open.
Solution-
- You need to replace the gas control to solve the problem.
7. Failed Trial for Ignition – Soft Lockout
In this case, the LED will flash 6 times with a pause of 3 seconds. An unstable pilot or restricted pilot tube can cause this problem. The pilot wire can also be damaged.
Solution-
- Check whether the gas pressure and voltage supply is okay. If the valve still doesn’t work, replace the pilot assembly
8. Recycle Limit – PS/Limit Opened – Soft Lockout
The LED will flash six times, but the sequence is a bit different than the previous one. There will be two flashes together and then a pause of three seconds. And this will repeat three times. A blocked vent or faulty pressure switch can cause this problem.
Solution-
- Check the vent system to ensure it is working properly. If needed, replace the pressure switch or temperature switch on the blower
9. Recycle Limit – Flame Lost – Soft Lockout
Three flashes together and then a pause of three seconds. When this sequence repeats twice, the problem can be caused by pilot wire damage, low gas pressure, or insufficient combustion air.
Solution-
- Besides checking the gas pressure and voltage supply, check if the combustion air is sufficient
10. Flame Out of Sequence Sense – Soft Lockout
The LED will flash four times in a row and then pause for three seconds. And then it will flash again twice. It means the gas valve is stuck in an open position.
Solution-
- You need to replace the gas control in this case
11. Flammable Vapor Sensor Lockout
There will be a total of seven consecutive flashes with a pause of three seconds to indicate this problem. It means there is flammable vapor near the heater or the flammable vapor sensor has failed.
Solution-
- Check for flammable vapor near the heater and remove the vapor. Try resetting the control, but you need to replace the sensor if the LED still flashes
12. FVS Fault Detected
The LED will flash eight times with a pause of three seconds, which means the flammable vapor sensor is out of specification or the wiring is faulty.
Solution-
- You should check the wiring first and replace it if necessary. If the light still flashes, replace the FV sensor
13. Temperature Sensor Fault Detected
Eight double flashes with a pause of three seconds will appear. It means the thermal well is faulty.
Solution-
- You need to check the thermal well wiring for faults. If it doesn’t work, you must replace the thermal well
14. Electronics Fault Detected
Eight triple flashes with a pause of three seconds indicate the thermal well or the gas control has gone bad.
Solution-
- You need to replace one or both of these components to solve the problem
15. Valve Fault Detected
The LED will flash four times in a row with a three-second pause. And it will repeat eight times. This status code means the gas control has been damaged or needs to be reset.
Solution-
- If resetting the gas control doesn’t work, you must replace it
Conclusion
Understanding LED status codes is crucial for Honeywell gas valve troubleshooting. Each code identifies a problem so that it becomes easier for users to find the cause and troubleshoot quickly. We discussed these status codes in detail so that you can figure out what is going on.
And the possible solutions for each problem enable you to fix the gas valve quickly. Pay attention to the flash sequence of the LED and try every possible solution to that specific problem. Next time a Honeywell gas valve doesn’t work correctly in an appliance, check the meaning of these codes to solve the problem.